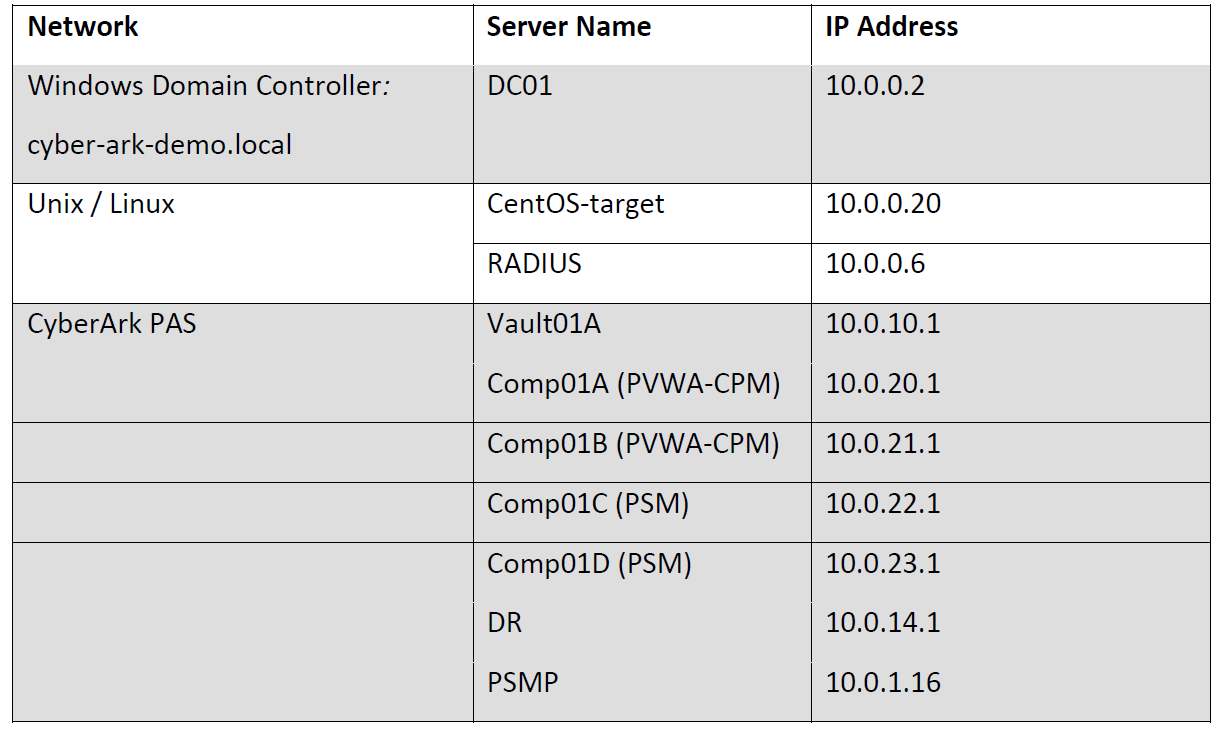
My Home CyberArk Lab Environment:
- Vault Server1: 192.168.2.21
- Vault Server2: 192.168.2.22
- PVWA/CPM/PSM 1 : 192.168.2.23
- PVWA/CPM/PSM 2 : 192.168.2.24
- PSMP-PSM Gateway
- PTA
- PSM-HTML5 GW
As my record, I put all simplified installation steps together as shown below:
Table of Contents
1. Vault Installation
Installation:
a. Remove unnecessary TCP/IP protocols and only left TCP/IP v4 enabled, and TCP/IP v6 disabled.
b. Right click setup.exe under C:\CyberArkInstallationFiles\Vault Install Files\Server to run as administrator
c. Same process to install PrivateArk client on the vault server.
 Verification:
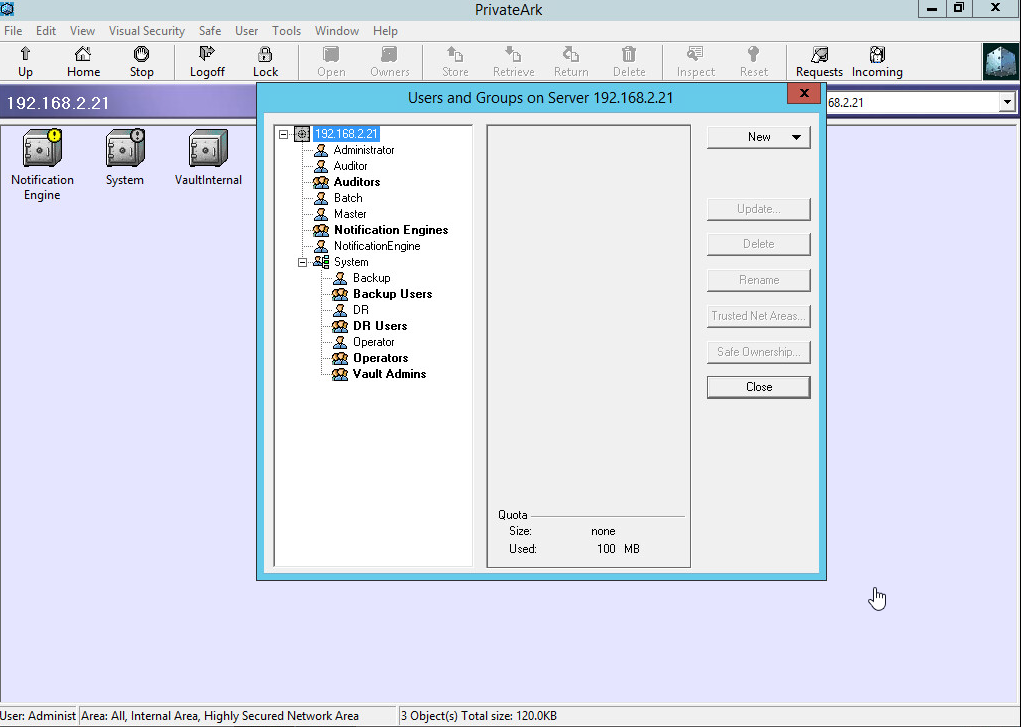
a. Make sure 3 safes existing in the vault.
b. Users / groups are listing in the vault as well
c. Open Windows Services and check that the following services have been installed and started.
- Cyber-Ark Event Notification Engine
- Cyber-Ark Hardened Windows Firewall
- CyberArk Logic Container
- PrivateArk Database
- PrivateArk Remote Control Agent
- PrivateArk Server
2. PVWA Installation
Installation:
a. Navigate to “C:\CyberArkInstallationFiles\Password Vault Web Access\InstallationAutomation”. Open Windows PowerShell as an Administrator in the folder specified in step 3 and execute the following PowerShell commands.
- Set-ExecutionPolicy Bypass
- .\PVWA_Prerequisites.ps1
b. Using File Explorer, navigate to folder “C:\CyberArkInstallationFiles\Password Vault Web Access\”. Right click setup.exe and “run as Administrator”.
c. IIS configuration;
- http redirecting to https
- Error page 403 redirect to PVWA web site
- IISRESET
Verification:
a. Open Chrome and confirm that the PVWA login page is displayed. This step validates that the PasswordVault application is communicating with the PrivateArk Server. Use URL https://comp01A.cyber-ark-demo.local/PasswordVault/v10/logon.
b. Login to the PVWA using CyberArk Authentication as Administrator. Validate tabs Policies, Accounts, Applications, Reports and Administration display correctly.
3. CPM Installation
Installation:
a. Using File Explorer, navigate to “C:\CyberArkInstallationFiles\Central Policy Manager\InstallationAutomation”. Open Windows PowerShell as an Administrator in the folder specified in step 4 and execute the following PowerShell commands.
- Set-ExecutionPolicy Bypass
- .\CPM_Preinstallation.ps1
b. In File Explorer open the extracted \Central Policy Manager folder. Right click setup.exe and choose “Run as Administrator”.
Verification:
Confirm that the CPM services are installed and running.
a. CyberArk Password Manager Service.
b. CyberArk Central Policy Manager Scanner.
4. PSM Installation
Installation:
a. Extract the folder “Privileged Session Manager” from “PSM CD Image-Rls-v10.9.zip” by double clicking and opening the zip file without initially extracting the files, then copy and paste the “PSM CD Image\Privileged Session Manager” folder to the root of C:\.
b. In File Explorer, navigate to “C:\Privileged Session Manager\InstallationAutomation\Prerequisites”. Edit PrerequisitesConfig.xml using “Notepad ++” search for and set all Enable= steps to YES. Save the file and exit.
c. Open Windows PowerShell as Administrator. Change directories to “C:\Privileged Session Manager\InstallationAutomation”. Execute the following commands.
- Set-ExecutionPolicy Bypass.
- .\Execute-Stage.ps1 C:\Privileged Session Manager\InstallationAutomation\Prerequisites\prerequisitesConfig.xml
d. When prompted in PowerShell, restart the server. After the server restarts, sign in with the same credentials used in step a to continue installation, The PowerShell script will launch immediately to complete the prerequisite installation. Allow the script to complete, then exit PowerShell.
e. A final step before PSM Installation is to assign an appropriate Domain Group access to the Session Collection.
- Open Server Manager and navigate to Remote Desktop Services -> Collections -> PSM-RemoteApp.
- In Properties, select TASKS -> Edit Properties -> User Groups.
- Add CYBER-ARK-DEMO\CyberArk Vault Admins and remove CYBER-ARK-DEMO\Domain Users,
f. Using File Explorer, navigate to C:\Privileged Session Manager. Right click setup.exe and choose “Run as administrator”. Select to install the Microsoft Visual C++ Redistributable Package (x86). Following the installation and server restart.
Verification:
a. Open PowerShell as administrator frp, “C:\Privileged Session Manager\InstallationAutomation” and Execute the following 2 commands.
- Set-ExecutionPolicy Bypass.
b. Then launch Execute-Stage.ps1 script with the location of the PostInstallationConfig.xml as the argument, as shown. Several scripts will be executed during this process.
- Execute-Stage.ps1 “C:\Privileged Session Manager\InstallationAutomation\PostInstallation\PostInstallationConfig.xml”
c. Review the log file in the location specified in the PowerShell command window.
5. DR Vault Installation
a. Same process to install PrivateArk server and client. Create your first vault , DRVault.
b. Open the PrivateArk client and login to the DRVault as administrator. Note that the only Safes in the Vault are the three built-in Safes.
DR failover and failback process is listed at post: CyberArk PAS HA, Backup, Failover and Failback Process
6. Post-Installation and Hardening
a. Sign in to the Comp01A server as Administrator. Navigate to C:\CyberArkInstallationFiles\(Components Name such as pvwa, psm, cpm)\InstallationAutomation\
for example: for pvwa, it is C:\CyberArkInstallationFiles\Password Vault Web Access\InstallationAutomation\
b. Open Windows PowerShell as an Administrator in the folder specified in step 1 and execute the following PowerShell commands. Select Yes when prompted.
- Set-ExecutionPolicy Bypass
- .\PVWA_Hardening.ps1
c. Wait until the script completes, then restart the server.
Scenario Example
Scenario
CyberArk Demo Inc. (“the Customer”) has just purchased CyberArk’s Privileged Account Security (PAS). This document details the Customer’s specific requirements regarding the use of PAS in their environment:
You are required to install and implement the PAS solution to support the customer’s specific requirements. You will be given access to CyberArk’s documentation in order to complete your task. You may use the detailed installation guide provided by the trainer or the formal CyberArk installation guide. The Installation guide provided by the trainer should be used in the training environment only. For production deployments use CyberArk published documentation for the version you are installing.
You have been assigned the responsibility to assist a customer to install and configure the CyberArk Privileged Access Security suite. The Customer has purchased CyberArk’s EPV solution to protect and manage their privileged accounts. End users are required to authenticate to CyberArk using two factor authentication.
In the following sections you will be required to:
1. Install a standalone Vault
2. Install 2 CPM Servers (one for managing Windows accounts and one for managing Unix and Oracle)
3. Install 2 PVWA Servers (Load Balanced, and configured for automatic failover to the DR vault)
4. Install 2 PSM Servers in a Load Balanced configuration
5. Install 1 PSMP Server
6. Install the Disaster Recovery and Vault Backup components
7. Integrate CyberArk with the Customer’s LDAP, SMTP and SIEM solutions
8. Implement 2 Factor Authentication
9. Test the PAS EPV implementation. Add test accounts on the following target systems; Windows Domain, Windows Server, Linux and Oracle and execute password management and PSM operations.
Contents
SCENARIO ………………………………………………………………………………………………………………………………………….. 10
EPV INSTRUCTIONS ……………………………………………………………………………………………………………………………… 11
VAULT INSTALLATION ………………………………………………………………………………………………………………………….. 12
BEFORE INSTALLATION ……………………………………………………………………………………………………………………………. 12
VAULT SERVER INSTALLATION……………………………………………………………………………………………………………………. 15
PRIVATEARK CLIENT INSTALLATION ……………………………………………………………………………………………………………… 23
POST VAULT INSTALLATION ……………………………………………………………………………………………………………………… 26
INSTALL PASSWORD VAULT WEB ACCESS ……………………………………………………………………………………………….. 27
INSTALL IIS PRE-REQUISITE SOFTWARE USING AUTOMATIC PREREQUISITES SCRIPT ………………………………………………………… 27
REQUIRE HTTP OVER SSL (PVWA) ……………………………………………………………………………………………………………. 29
INSTALL PVWA …………………………………………………………………………………………………………………………………… 29
HARDENING THE CYBERARK PVWA SERVERS …………………………………………………………………………………………………. 32
CONFIGURE IIS REDIRECTION ……………………………………………………………………………………………………………………. 34
TEST PVWA LOAD BALANCING …………………………………………………………………………………………………………………. 36
INSTALL CPM (DISTRIBUTED) ………………………………………………………………………………………………………………… 37
INSTALL 1ST CPM …………………………………………………………………………………………………………………………………. 37
INSTALL THE PRIVATEARK CLIENT ON THE COMPONENT SERVER……………………………………………………………………………… 41
POST CPM INSTALLATION ……………………………………………………………………………………………………………………….. 41
INSTALL 2ND CPM…………………………………………………………………………………………………………………………………. 41
POST CPM INSTALLATION ……………………………………………………………………………………………………………………….. 42
INSTALL THE PRIVATEARK CLIENT ON THE COMP01B SERVER………………………………………………………………………………… 43
RENAME 1ST CPM ………………………………………………………………………………………………………………………………… 43
UPDATE THE NAME OF THE CPM IN THE PVWA………………………………………………………………………………………………. 46
HARDEN THE CPM SERVER ………………………………………………………………………………………………………………………. 46
INTEGRATIONS ……………………………………………………………………………………………………………………………………. 48
LDAP AUTHENTICATION (OVER SSL) …………………………………………………………………………………………………………… 48
SMTP INTEGRATION ……………………………………………………………………………………………………………………………… 53
SIEM INTEGRATION ………………………………………………………………………………………………………………………………. 56
NTP INTEGRATION ……………………………………………………………………………………………………………………………….. 59
AUTHENTICATION TYPES ……………………………………………………………………………………………………………………… 62
RADIUS AUTHENTICATION ……………………………………………………………………………………………………………………… 62
PKI AUTHENTICATION ……………………………………………………………………………………………………………………………. 68
TWO FACTOR AUTHENTICATION (2FA) ………………………………………………………………………………………………………… 72
EPV TESTING AND VALIDATION …………………………………………………………………………………………………………….. 73
ADD WINDOWS DOMAIN ACCOUNT ……………………………………………………………………………………………………………. 73
ADD WINDOWS SERVER LOCAL ACCOUNT……………………………………………………………………………………………………… 73
ADD LINUX ROOT ACCOUNT …………………………………………………………………………………………………………………….. 74
ADD ORACLE DATABASE ACCOUNT……………………………………………………………………………………………………………… 74
Privileged Account Security Install & Configure, v10.9
CyberArk University Exercise Guide Page 2
© Cyber-Ark® Software Ltd – No part of this material may be disclosed to any person or firm or reproduced by any means, electronic and mechanical,
without the express prior written permission of Cyber-Ark® Software Ltd.
INSTALL PSM/PSMP …………………………………………………………………………………………………………………………….. 76
INSTALL A STANDALONE PSM INSTALLATION ………………………………………………………………………………………….. 77
PSM INSTALLATION PREREQUISITES ……………………………………………………………………………………………………………. 77
PSM INSTALLATION ………………………………………………………………………………………………………………………………. 80
PSM POST INSTALLATION ……………………………………………………………………………………………………………………….. 83
PSM HARDENING ………………………………………………………………………………………………………………………………… 84
PSM TESTING AND VALIDATION ………………………………………………………………………………………………………………… 86
LOAD BALANCED PSM SERVERS …………………………………………………………………………………………………………….. 89
CONFIGURE PSM LOAD BALANCING ……………………………………………………………………………………………………………. 89
PSM FOR SSH INSTALLATION ………………………………………………………………………………………………………………… 92
SECURING CYBERARK …………………………………………………………………………………………………………………………… 98
LOCK DOWN A USER’S INTERFACE ………………………………………………………………………………………………………………. 98
USE RDP OVER SSL ………………………………………………………………………………………………………………………………. 99
MANAGE LDAP BINDACCOUNT ………………………………………………………………………………………………………………. 104
MANAGE PSMCONNECT/PSMADMINCONNECT USING THE CPM ……………………………………………………………………….. 105
MANAGE CYBERARK ADMINISTRATOR ACCOUNT USING THE CPM ……………………………………………………………………….. 109
CONNECT WITH PSM-PRIVATEARK CLIENT ………………………………………………………………………………………………….. 110
CONNECT USING PSM-PVWA-CHROME ……………………………………………………………………………………………………. 113
BACKUP ……………………………………………………………………………………………………………………………………………. 116
ENABLE THE BACKUP AND DR USERS …………………………………………………………………………………………………………. 116
INSTALL THE PRIVATEARK REPLICATOR COMPONENT ……………………………………………………………………………………….. 119
TESTING THE BACKUP/RESTORE PROCESS ……………………………………………………………………………………………………. 123
DISASTER RECOVERY………………………………………………………………………………………………………………………….. 126
INSTALL THE DISASTER RECOVERY MODULE ………………………………………………………………………………………………….. 126
VALIDATE THE REPLICATION WAS SUCCESSFUL ……………………………………………………………………………………………….. 129
EXECUTE AUTOMATIC FAILOVER TEST ………………………………………………………………………………………………………… 130
EXECUTE FAILBACK PROCEDURE USING MANUAL FAILOVER ……………………………………………………………………………….. 132
(OPTIONAL) EXERCISES ………………………………………………………………………………………………………………………. 137
ADVANCED PSMP IMPLEMENTATIONS …………………………………………………………………………………………………. 138
ADDING FIREWALL RULES TO THE VAULT MANUALLY …………………………………………………………………………….. 142
YouTube video: