Met all kinds of issues while using Windows 10. Resolved them usually by googling online. List some of typical ones here:
- Fix High CPU Usage by Windows Software Protect Service (Sppsvc.exe)
- Microsoft Office can’t find your license for this application or Windows is not activated
- Windows 10 Defaultuser0 password Issue
- Can’t open gpedit.msc
- Account restrictions are preventing this user from signing in
- Disable Windows Updates
- Enable Safe Mode
Table of Contents
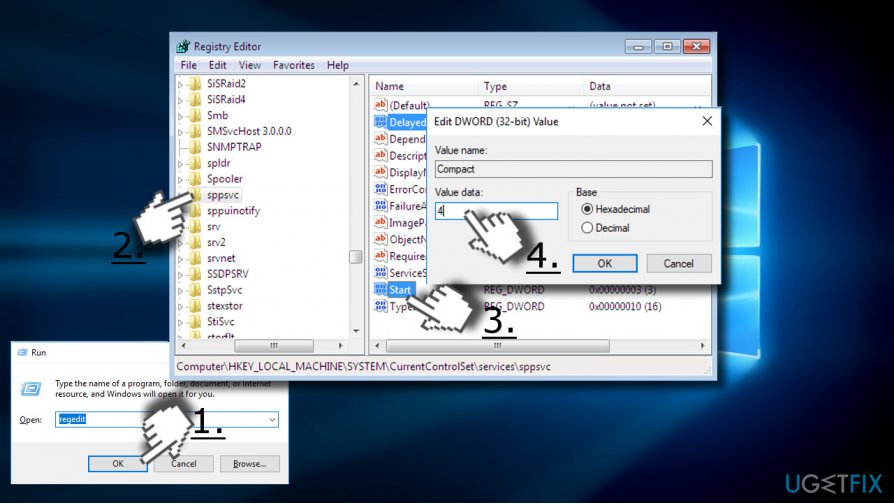
High CPU Usage
This case is caused by Windows Software Protect Service (Sppsvc.exe)
- Click Win key + R, type regedit, and press Enter.
- Navigate to the HKLM\\SYSTEM\\CurrentControlSet\\Services\\sppsvc using the left pane.
- Modify the Start value from any number to 4
.
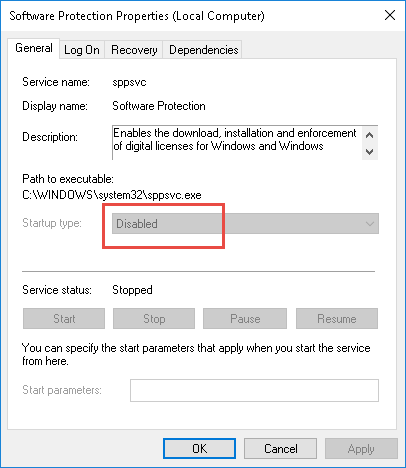
Microsoft Office can’t find your license for this application or Windows is not activated

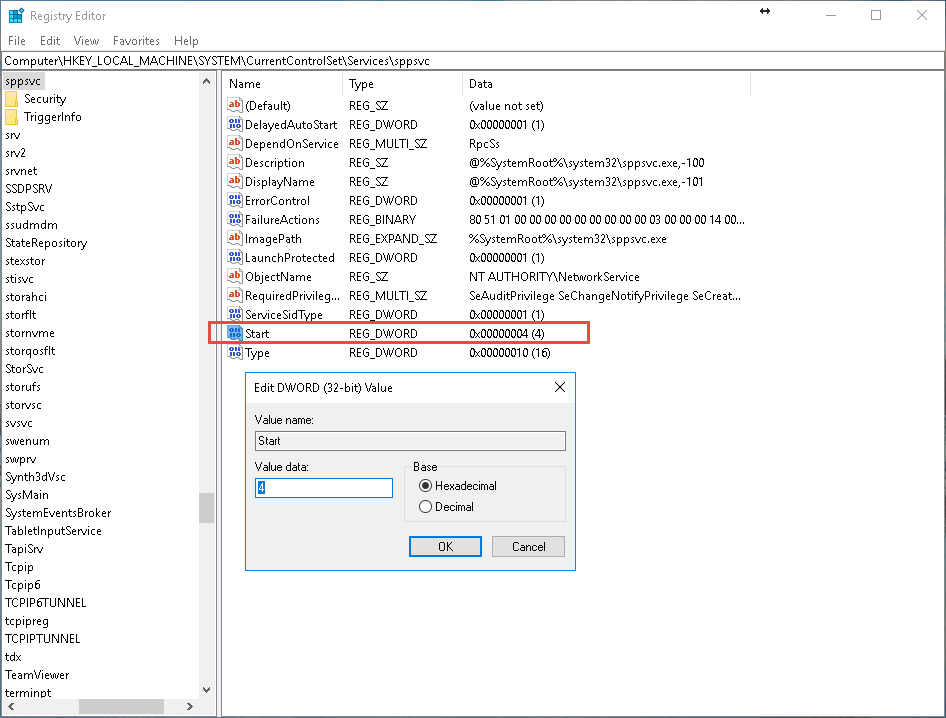
Issue is relating to disabled Windows Software Protect Service (Sppsvc.exe).
If HKLM\\SYSTEM\\CurrentControlSet\\Services\\sppsvc value is 4 and sppsvc.exe Software Protection service is disabled. You will need to change HKLM\\SYSTEM\\CurrentControlSet\\Services\\sppsvc value to 2 or 3 to enable it to get your Microsoft software license activated automatically.
Windows 10 Defaultuser0 password Issue
Step One:Boot up your computer.
Step Two:When booted up hold down your “shift” key and click on the restart button on the bottom right of your screen.
Step Three:This will bring you into the Advanced Option menu. From there click on “Troubleshooting” and then “System image restore”.
*What this will do is bring you to your system restore screen and prompt you with restore points*

Step Four:Select your most recent restore point and start the restore process.
*When prompt to select an account you will see administrator. Simply click is and DO NOT PUT IN A PASSWORD leave it blank*
*Will only be one restore point if a clean install of windows 10*
Step Five:When your computer finishes this (time will vary) simply restart when prompt and it will start loading up the Windows 10 Setup screen.
Step Six:
Create your Account.
What the restore did was bring your computer back to the point where windows 10 just finished installing but hasn’t setup a profile yet. This will just bring you through the step by step instructions to create a user account you can actually use.
If you did not save a restore point, you had better to reset it to wipe every personal stuff. Click “Troubleshoot”, then “Reset This PC”, and finally “Remove Everything”. You’ll drop to a black screen with the word “Preparing” in the large, friendly letters characteristic of Windows 10. Eventually, you will return to a blue screen asking if you want to clean the drives as well. Click “Just remove my files” and then the “Reset” button on the next page. The screen will go black again and display the Windows 10 progress indicator while it chugs through the reset process.
Can’t open gpedit.msc
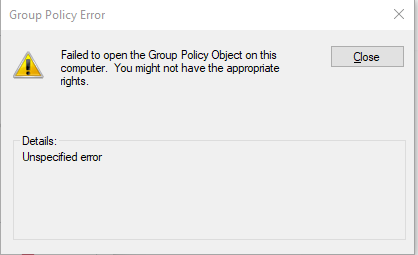
Tried to use gpedit.msc and got following messages:
Failed to open the Group Policy Object on this computer. You might not have the appropriate rights — unspecified error.
Solution:
Rename machine folder name to something else at C:\Windows\System32\GroupPolicy,
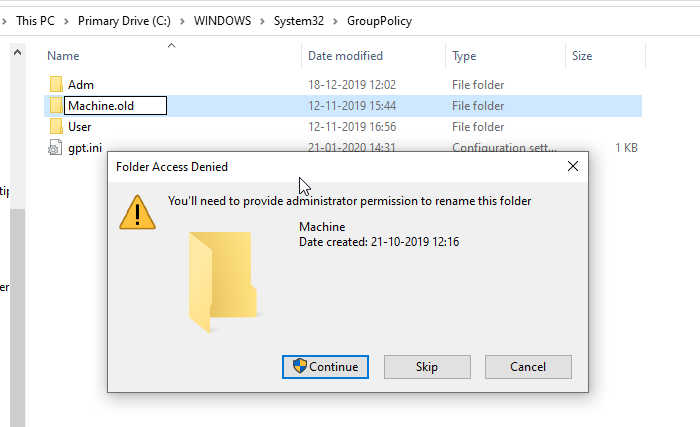
You also can choose to delete all the files inside the Machine folder instead of renaming it. Windows will automatically recreate the required files when you relaunch the policy editor.
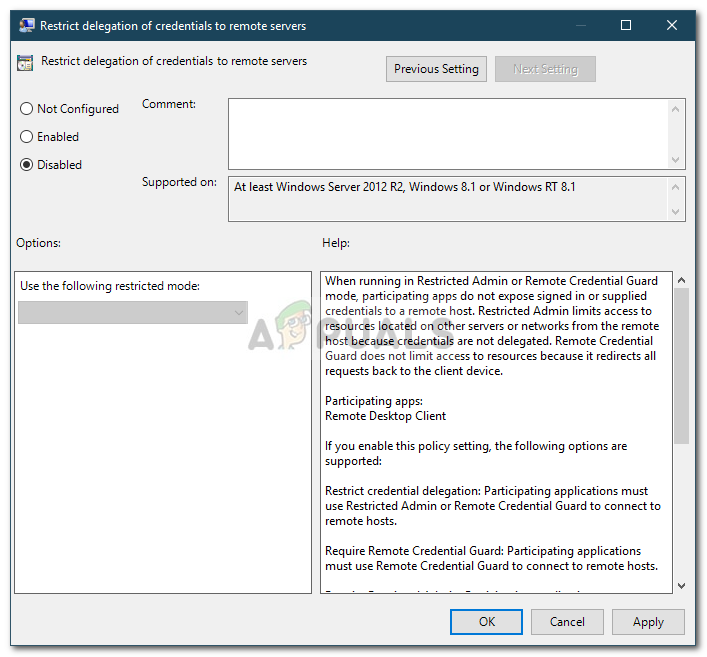
Account restrictions are preventing this user from signing in

Account restrictions are preventing this user from signing in. For example: blank passwords aren’t allowed, sign in times are limited, or a policy restriction has been enforced.
I am sure there is no blank password and limited sign in time. It must be restricted by group policy.
- Run gpedit.msc. Once the Windows Local Group Policy Editor opens up, navigate to the following directory:
Computer Configuration > Administrative Templates > System > Credentials Delegation
- There, on the right-hand side, locate the ‘Restrict delegation of credentials to the remote servers’ policy.
- Double-click it to edit it. Set it to Disabled, click Apply and then hit OK.
-
Following two policies changes
-
Computer Configuration > Windows Settings > Security Settings > Local Policies > Security Options
-
Accounts: Administrator account status – Enabled
-
Accounts: Limit local account use of blank passwords to console login only – Disabled

Disable Windows Updates
You can find this program from : https://www.sordum.org/9470/windows-update-blocker-v1-6/

Disable following four services:
1. Background Intelligent Transfer Service
2. Windows Update
3. Update Orchestrator Service
4. win10 upgraded to after version 1800, ,there is one more service to disable “Windows Update Medic Service”
————————————————
Also, you will find there are two services which will need to use registry key to disable them.
1. Update Orchestrator Service
2. Windows Update Medic Service
=================================================
If your services come back running again after a couple of days , you might want to try following two methods:
Method 1:
Here is another registry key, you might want to give it a try: Navigate to the following path in the registry: HKEY_LOCAL_MACHINE\SOFTWARE\Policies\Microsoft\Windows
1. Right-click the Windows (folder) key, select New, and then click the Key option.Name the new key WindowsUpdate and press Enter.
2. Right-click the newly created key, select New, and click the Key option.Name the new key AU and press Enter.
3. Right-click on the right side, select New, and click the DWORD (32-bit) Value option.Name the new key NoAutoUpdate and press Enter.
4. Double-click the newly created key and change its value from 0 to 1.
Click the OK button.Restart your computer.
—————————–
Method 2:
Another way is to use group policy. Run gpedit.msc as administrator then navigate to the following path:
Computer Configuration\Administrative Templates\Windows Components\Windows Update
1. Double-click the Configure Automatic Updates policy on the right side.
2. Check the Disabled option to turn off the policy. Click the Apply then OK button
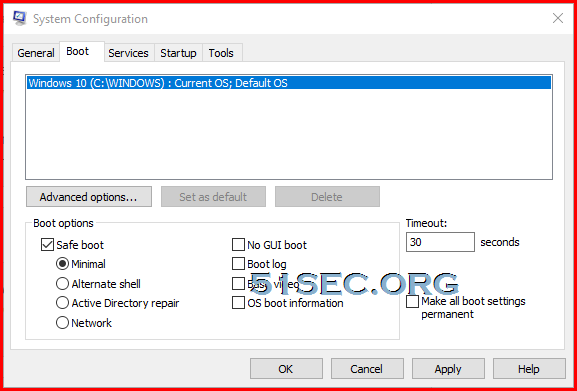
Enter Windows 10 Safe Mode
1 From Troubleshooting Mode

Troubleshoot > Advanced options > Startup Settings > Restart.

2 From Normal Windows Mode
- Press Win +R
- Type Msconfig , Enter
- Choose Boot Option
- Check Safe Boot with Minimal option