This post is a quick sum up how to get GNS3 VM running in your VMWare environment. A basic GRE tunnel lab has been created for demonstrating the configuration.
Table of Contents
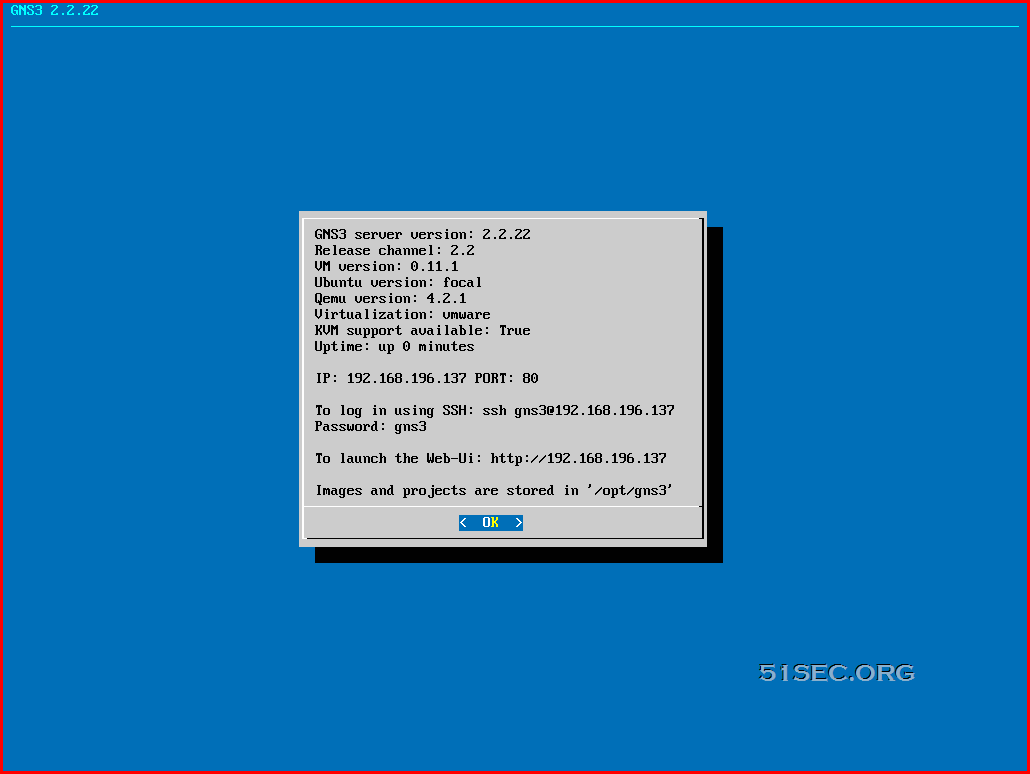
Download & Start GNS3 VM
https://ift.tt/3gbeuIN
The GNS3 VM is recommended for most situations when you are using Windows or Mac OS. The GNS3 development team have worked hard to create a lightweight, robust way of creating GNS3 topologies that avoids multiple common issues experienced when using a local install of GNS3.
It is about 1GB file. After unzipped the file, you will get a “GNS3 VM.ova” file, which you can double click on it to import it into your VMWare workstation.
For better performance, I gave this VM 8G Ram and 4 vCoure CPU.
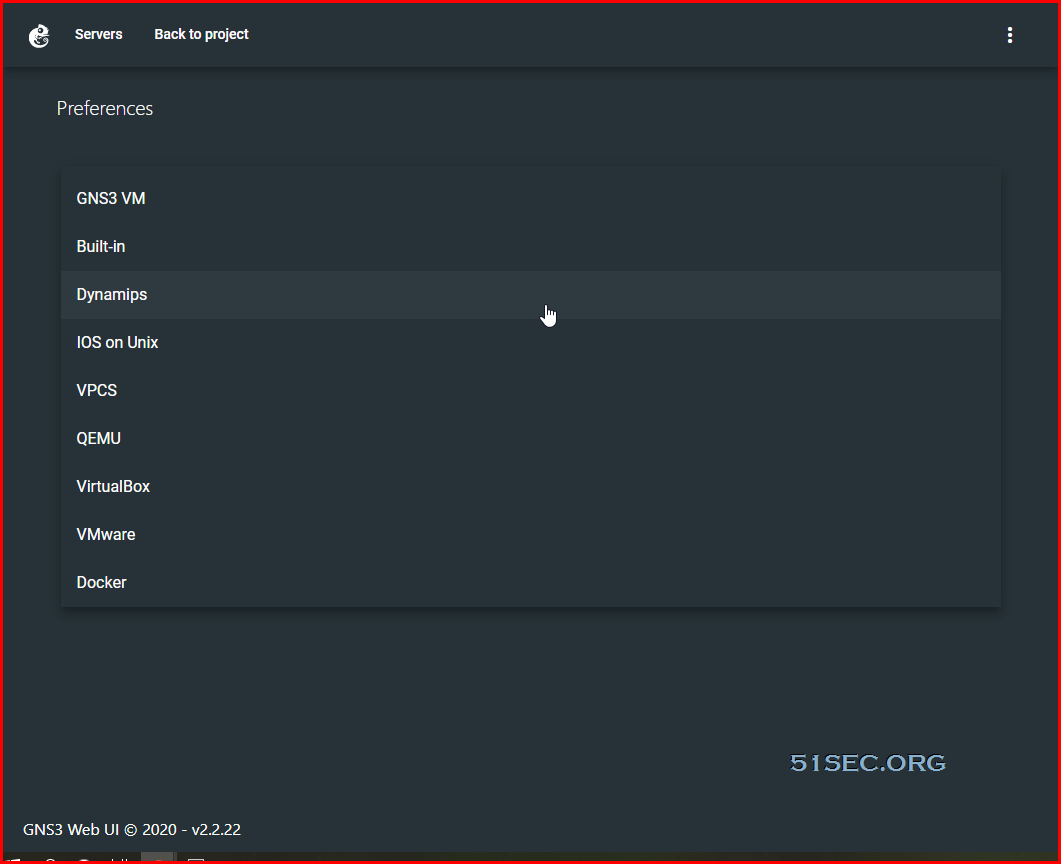
Adding Cisco IOS Dynamips Routers
By default, you can add virtual pcs, switches, hub, frame relay switch, nat cloud, atm switch, etc. You will need to manual add cisco ios routers.
Go to preferences -> Dynamips -> Add IOS router template.
You can find out which image is best for GNS3:
https://ift.tt/3qQgdK9
C3620
The c3620 supports up to 2 Network Modules (maximum of 8 Ethernet ports, 32 FastEthernet ports or 8 serial ports). Note that tt shouldn’t be used since the latest available IOS image is very old.
IOS version 12.2.26c
File name: c3620-a3jk8s-mz.122-26c.bin MD5: dd34b958ad362ef54ba48b187f4c97b4 Minimum RAM: 64MB Proposed idle-PC value: 0x603a8bac
C3640
The c3640 supports up to 4 Network Modules (maximum of 16 Ethernet ports, 32 FastEthernet ports or 16 serial ports).
IOS version 12.4.25d (Mainline)
File name: c3640-a3js-mz.124-25d.bin MD5: db9f63ca1b46d18fb835496bfffe608a Minimum RAM: 128MB Proposed idle-PC value: 0x6050b114
From: https://ift.tt/2UskTK0
| r | Cisco IOS Image Name | Size | Description | Download |
| 1 | c1710-bk9no3r2sy-mz.124-23.image | 36MB | For EVE-NG | Download |
| 2 | c1700-adventerprisek9-mz.124-25d.image and c1700-adventerprisek9-mz.124-25d.image.md5sum |
55MB | For GNS3 & EVE-NG |
Download |
| 3 | c2600-adventerprisek9-mz.124-15.T14.image and c2600-adventerprisek9-mz.124-15.T14.image.md5sum |
83MB | For GNS3 & EVE-NG |
Download |
| 4 | c2691-adventerprisek9-mz.124-15.T14.image and c2691-adventerprisek9-mz.124-15.T14.image.md5sum |
92MB | For GNS3 & EVE-NG |
Download |
| 5 | c3620-a3jk8s-mz.122-26c.image and c3620-a3jk8s-mz.122-26c.image.md5sum |
37MB | For GNS3 & EVE-NG |
Download |
| 6 | c3640-a3js-mz.124-25d.image and c3640-a3js-mz.124-25d.image.md5sum |
63MB | For GNS3 & EVE-NG |
Download |
| 7 | c3660-a3jk9s-mz.124-15.T14.image and c3660-a3jk9s-mz.124-15.T14.image.md5sum |
86MB | For GNS3 & EVE-NG |
Download |
| 8 | c3725-adventerprisek9-mz.124-15.T14.image and c3725-adventerprisek9-mz.124-15.T14.image.md5sum |
93MB | For GNS3 & EVE-NG |
Download |
| 9 | c3745-adventerprisek9-mz.124-25d.image and c3745-adventerprisek9-mz.124-25d.image.md5sum |
78MB | For GNS3 & EVE-NG |
Download |
| 10 | c7200-adventerprisek9-mz.153-3.XB12.image and c7200-adventerprisek9-mz.153-3.XB12.image.md5sum |
125 MB | For GNS3 & EVE-NG |
Download |
| 11 | c7200-adventerprisek9-mz.152-4.S6.image | 89MB | For GNS3 & EVE-NG |
Download |
| 12 | c7200-adventerprisek9-mz.124-24.T5.image and c7200-adventerprisek9-mz.124-24.T5.image.md5sum |
98MB | For GNS3 & EVE-NG |
Download |
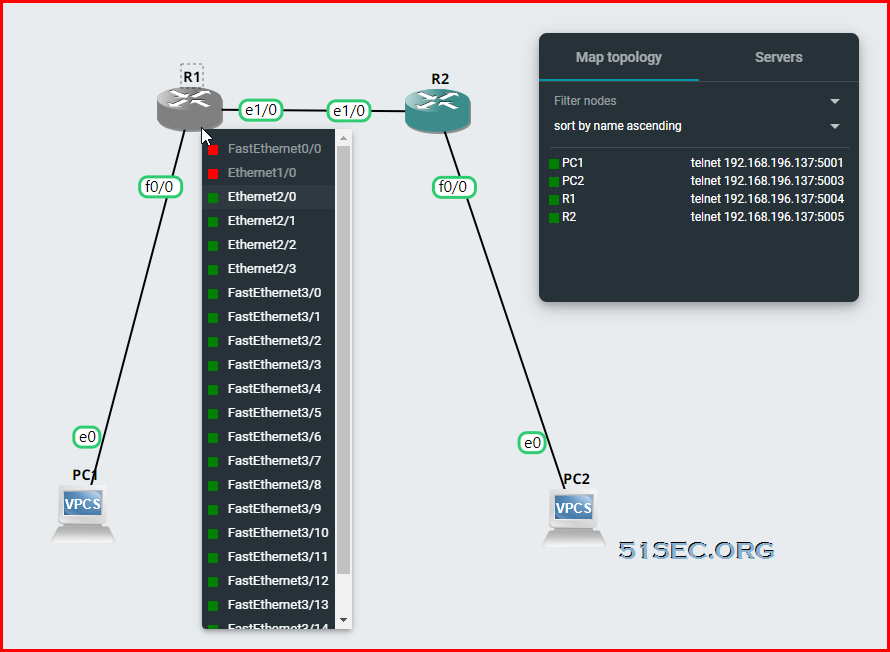
Create a simple GRE Lab topology
R1 and R2 are 3640.
Create vlan in 3640 switch module:
R1# vlan database
R1(vlan)#show
R1(vlan)#vlan 3
R1(config)# interface fastethernet3/11
R1(config-if)# switchport mode access
R1(config-if)# switchport access vlan 3
R1(config-if)# end
Basic GRE configuration on R1 router:
The Process for Cisco Router Debugging IP Traffic
Note: PLEASE make sure to use this commands very carefully. If there’s a lot of traffic between hosts you may crash the router.
1) Turn “on” process switching under both interfaces in the router.
Router(config)#interface e1/0
Router(config-if)#no ip route-cache
Router(config)#interface f0/0
Router(config-if)#no ip route-cache
2) Create an access-list. Define specific traffic you want to monitor between hosts.
For example:
Router(config)#access-list 199 permit tcp host x.x.x.x eq
Router(config)#access-list 199 permit tcp host y.y.y.y eq
3) If you are in a telnet session into the router turn “terminal monitor” on.
Router#term mon
If you are in a console session into the router, then the “logging console” command.
Router(config)#logging console
4)Finally the debug command.
Router#debug ip packet 199 detail
Where 199 is the access-list # we created.
5)Use the “un all” command to turn it off.
Router#un all
Here is a link also where you can find this procedure: Using the Debug Command. http://www.cisco.com/warp/public/63/ping_traceroute.html#usingdbg
If you turn on “process switching” on only one interface, you will only be able to debug traffic on that particular interface as well.
from Blogger http://blog.51sec.org/2021/07/gns3-create-gre-tunnel-lab-using-3640.html